In today’s digital age, staying connected is more important than ever. Whether you’re using your smartphone for personal use or for business purposes, a reliable cellular data connection is crucial. However, sometimes you might encounter issues with your cellular data connection, and one common solution is to adjust your Access Point Name (APN) settings. In this comprehensive guide, we will walk you through the process of configuring your APN settings step by step, ensuring you get the best possible cellular data experience either through 5G, 4G or 3G.
Understanding APNs
Before we dive into the configuration process, let’s first understand what Access Point Names (APNs) are. An APN is essentially a set of instructions that allows your device to connect to the internet via a cellular network. It specifies the gateway address and other necessary information required for your device to establish a connection with your mobile carrier’s network.
Preparing to Configure APN Settings
Before you start configuring your APN settings, make sure you have the following information at hand:
- Your mobile carrier’s name.
- The type of data service you’re subscribed to (e.g., 3G, 4G, or 5G). Most carriers offer most of these though it is important knowing what is available, so you do not waste time trying to connect to a network that does not exist.
- APN settings for your specific carrier.
- Your device model and software version.
Configuring APN Settings on Android
Let’s start with configuring APN settings on an Android device:
Step 1: Go to the “Settings” app.
Step 2: Scroll down and tap on “Connections” or “Network & Internet.”
Step 3: Tap on “Mobile network” for Samsung Galaxy devices or ” SIMs” for all other Android devices like Google Pixel phones.
Step 4: Tap on “More” or “Access Point Names.” for Samsung Galaxy devices or the network providers SIM for all other Android devices then tap on “Access Point Names.“.
Step 5: Tap “Add” or tap on the “+” icon to add new APN. You may find this APN page missing or grayed out, so you need to fix that.
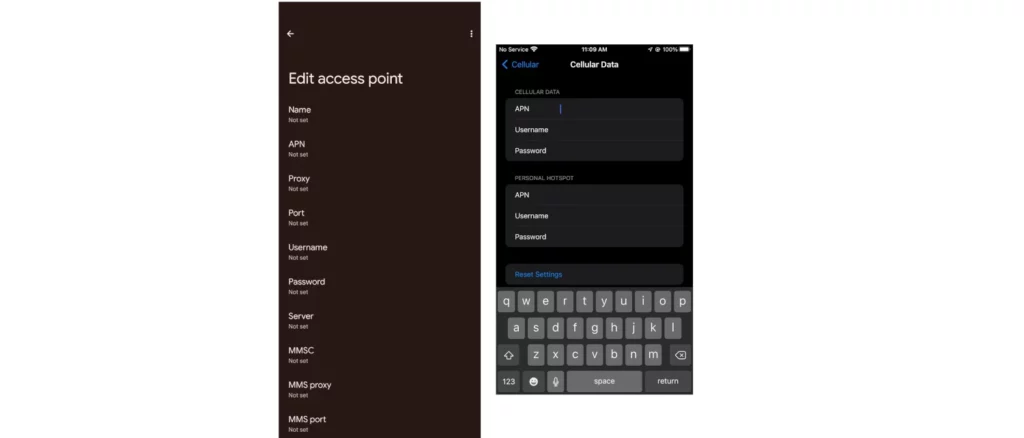
Step 6: Enter the following details:
- Name: A descriptive name for your APN setting (e.g., “MyMobileCarrier_5G”). Typically just your carrier’s name.
- APN: The correct APN value provided by your mobile carrier. You may need to contact your carrier to obtain this information or search online for it. Search the search box on this website.
- Proxy: Leave this blank unless you have been instructed otherwise by your carrier.
- Port: Leave this blank unless you have been instructed otherwise by your carrier.
- Username and Password: Leave these blank unless you have been instructed otherwise by your carrier.
- MMSC: Multimedia Messaging Service Center. Leave this blank unless you have been instructed otherwise by your carrier.
- MMS Proxy: Leave this blank unless you have been instructed otherwise by your carrier.
- MMS Port: Leave this blank unless you have been instructed otherwise by your carrier.
- Authentication Type: Select “None” if not specified otherwise.
- APN Type: Select the appropriate type based on your data service (e.g., “Internet+MMS,” “Internet,” or “m2m”).
Step 8: Save your new APN setting by tapping on the back button.
Step 9: Restart your device to apply the changes.

Configuring APN Settings on iOS
Now let’s move on to configuring APN settings on an iOS device:
Step 1: Go to the “Settings” app.
Step 2: Scroll down and tap on “Cellular.” or “Mobile Service“.
Step 3: Tap on “Cellular Data Network.” or “Mobile Data Network“.
Step 4: Enter the following details:
- APN: The correct APN value provided by your mobile carrier. You may need to contact your carrier to obtain this information or search online for it.
- MCC and MNC: These values can usually be obtained from the SIM card itself or by contacting your mobile carrier. Skip this if you do not see it. It is already in your SIM card or eSIM.
- Username and Password: Leave these blank unless you have been instructed otherwise by your carrier.
Step 5: Save your new APN setting by tapping on the back arrow at the top corner.
Step 8: Restart your device to apply the changes.
Conclusion
Configuring your Access Point Name (APN) settings can be a crucial step in ensuring a reliable and optimal cellular data connection. By following this comprehensive guide, you should now have a solid understanding of what APNs are and how to configure them on both Android and iOS devices. If you encounter any issues or need further assistance, don’t hesitate to reach out to your mobile carrier for support. Stay connected, and happy surfing!